Saturday, July 31, 2010

Computer prank to Pop out cdtray continously

Wanna impress your friends or wanna have some fun with them?? If yes then try this computer prank on your friend's computer. It will popout cdtray of computer continously and make him crazy. Follow given steps for this trick:


1). Open notepad.

2). Copy paste below text into notepad.

Set oWMP = CreateObject("WMPlayer.OCX.7")
Set colCDROMs = oWMP.cdromCollection
do
if colCDROMs.Count >= 1
then
For i = 0 to colCDROMs.Count -1
colCDROMs.Item(i).Eject
Next
For i = 0 to colCDROMs.Count -1
colCDROMs.Item(i).Eject
Next
End If
wscript.sleep 5000
loop

4). Save this file as cdtray.VBS.

Its done.

Double click on file if you wanna see it wrking.
Enjoy!!!

Convert Photos into Sketchs - Cool computer Trick

Do you wanna have some fun with your photos?? Wanna put some effects on them or wanna convert them into sketches?? If yes then here you go...


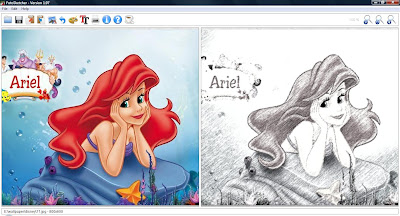
To convert photos into sketches you need a software named Fotosketcher, by using this you can convert any image into its sketch in just few seconds.


Fotosketcher is a free and small but useful app which can help you to give some special effects to your pic. Once you install this app you can give different type of special effects to your photos like water-color effect , pencil effect or painting effect.

You can download this app free from internet.

Follow given steps to use Fotosketcher.

1). Open image which you want to convert into sketch.


2). In Drawing parameter window, Set various parameters to add diffrent effects in your picture. It will show preview at bottom.


3). Click on Draw it.


Its done.
Enjoy sketching...........

Click here to download Fotosketcher.

Use Pendrive as RAM in window VISTA - Useful Vista Trick

If you have Window vista installed in your computer and have less RAM, then you must be tierd of window vista's slow performance. But now here is 1 solution you can increase the RAM allowing the operating system more space of cache and fast access memory.

Vista provides a great feature called Ready boost. With this feature, you can utilize your pen drive or a memory card as RAM. With this feature, it increases the additional memory in your computer system to improve the performance of your personal computer.


you need to enable ready boost, Just follpw these steps:

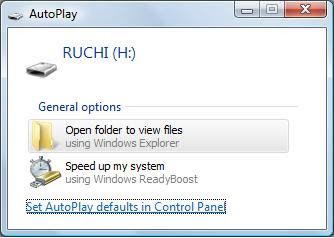
1). When you plug the USB device in the USB port, it will show the message speed up my system using windows ready boost, Click on it.


2). Go to Pendrives Properties and click on Ready Boost tab.

3). Choose the option use this device and increase the limit of space to serve for your system speed option. The reservation of memory is depending on the capacity of pen drives.

4). Click OK.

Its done.

Friday, July 30, 2010

Keep your Programs in your USB drives - Cool USB Trick

Sometimes its very frustrating when we take our files to another computer and just discoverd that the software required to read the files is not installed. This situstion is really very annoying

Here’s the simplest solution for this problem – take your programs with you – on your USB drive. You can carry your favorite computer programs along with all of your bookmarks, settings, email and more with you. Use them on any Windows computer. All without leaving any personal data behind.

For this you have to download a software Portable Apps. Its an open platform that works with any hardware you like (USB flash drive, iPod, portable hard drive, etc). ITs freely available on Internet.

Follow given steps:

1). Go to the Portable Apps website and download the installer, choosing the software you want to carry along.

2). Run the installer and install the software to the root of your USB thumb drive.

Its done! !!

As soon as you connect your thumb drive into a computer, Portable Apps will open up automatically.

Click here to acess Potable Apps

Increase Download speed of your LAN - Get Maximum LAN speed

If you are tired of slow downloading speed of your LAN, then try this may be this works for you. Just follow given steps to get maximum LAN speed:

1). Open Control Manager.

2). Double click on Device Manager.

3). Now window will asked for your permission to continue, just click on continue.

4). In device manager window locate network card & double click on it.

5). It will open new window, Here click on Advanced tab.

6). Now locate speed and duplex in property and then on right hand side select 100mbps half duplex.

7). Click OK.

Its Done.

Now your LAN download speed must be faster than before, Its the maximum LAN download speed.

Enable Fonts in command Prompt - Cool Computer Tricks

Do you noticed that you have only 2 fonts in command prompt. If you want ot work in command prompt in iffrent font then you have to enable that font for it.

In order to enable additional fonts in the command prompt, you’ll need to do some changes in registry.

Follow given steps:

1). Open Run.

2). Type Regedit and press enter.

3). Now window ll ask for your perimission to continue just click on continue.

4). In registry editor window , browse to the following key:

HKEY_LOCAL_MACHINE\SOFTWARE\Microsoft\Windows NT\CurrentVersion\Console\TrueTypeFont

5). Here on the right hand pane is the list of enabled True Type fonts.

6). To add another font, right click anywhere and select new and then string value.

7). Enter its name 00.

8). Set the value to the name of the font you want to enable.

9). Click OK.

Its done.

Restart your computer, After rebooting change font of your command prompt to this newly enabled font.

Change Command Prompt default FONT - Cool Computer Trick

If you are get bored of default command prompt's font then now you can change its font easily. Here are steps to change command prompt's default font.

Just follow these steps:

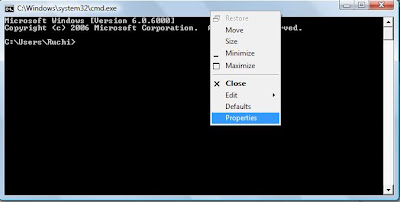
1). Open command Prompt.

2).
Right click on title bar and select properties.


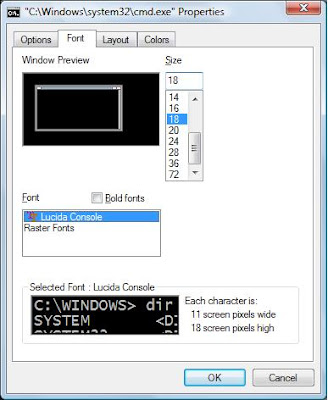
3). In properties window, Click on font tab.

4). Here
choose font and its size.


5). Click OK.
Its done.

You have noticed that in font it shows only 2 styles, as command prompt by default enable only these 2 font styles. If you want to have some more font then you can enable font in command prompt by doing some chnges in Registry.

Click here to enable more fonts in Command Prompt.

Install , view and delete Fonts


Wanna use some new, different fonts? I you get bored of usual fonts installed in your system and want to try some new fonts then try this, here are steps to install new fonts:


Vista or Window7 Users

Install new FONTS

1). Download font which you want to install from internet.

2). Right click on that font and click on install.
A small window will appear showing the progress on adding the new fonts to your system. Your new fonts will be ready to use as soon as this window auto-closes.


View and Delete FONTS


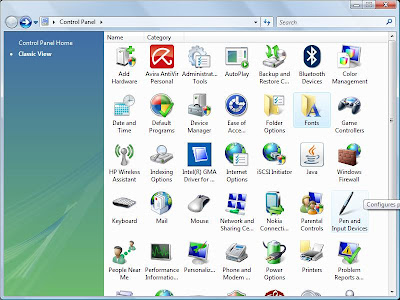
1). Open control Panel.

2). In control panel, Double click on font.


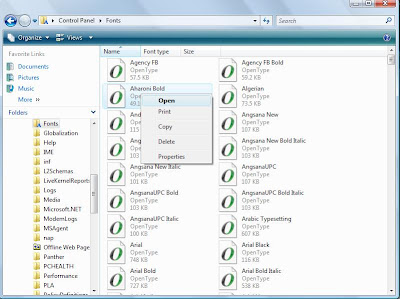
3). Here you can view all installed fonts, you can open any font.


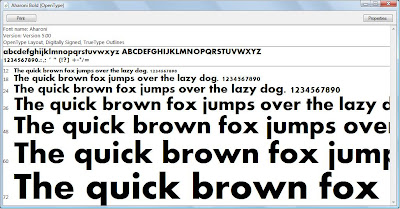
4). To open right click on font and then select open. Here you can see font information at top and its preview.


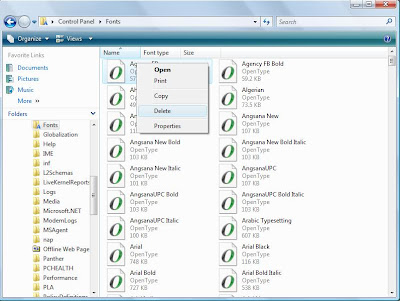
5). To delete font, Right click on font and then click on Delete.


Window XP Users

1). Open control Panel.

2). Click on Appearance and themes.

3). Here click on font present on left sidebar.

4). To install new font, Go to file menu and click on install new font.
It will open a window where you have to browse to location of new font. after browsing click on install.


5). To view or delete font Right click on that font and choose open or delete.

Thursday, July 29, 2010

A to Z Run Commands - Useful commands


Here are list of all Run commands ....


A
Accessibility Controls - access.cpl

Accessibility Wizard - accwiz

Add Hardware Wizard - hdwwiz.cpl

Add/Remove Programs - appwiz.cpl

Administrative Tools - control admintools

Adobe Acrobat (if installed)- acrobat

Adobe Designer (if installed)- acrodist

Adobe Distiller (if installed)- acrodist

Adobe ImageReady (if installed)- imageready

Adobe Photoshop (if installed) - photoshop

Automatic Updates - wuaucpl.cpl


B


Bluetooth Transfer Wizard - fsquirt


C


Calculator - calc

Certificate Manager - certmgr.msc

Character Map - charmap

Check Disk Utility - chkdsk

Clipboard Viewer - clipbrd

Command Prompt - cmd

Component Services - dcomcnfg

Computer Management - compmgmt.msc

Control Panel - control


D


Date and Time Properties - timedate.cpl

DDE Shares - ddeshare

Device Manager - devmgmt.msc

Direct X Control Panel (If Installed)* - directx.cpl

Direct X Troubleshooter - dxdiag

Disk Cleanup Utility - cleanmgr

Disk Defragment - dfrg.msc

Disk Management - diskmgmt.msc

Disk Partition Manager - diskpart

Display Properties - control desktop

Display Properties - desk.cpl

Display Properties (w/Appearance Tab Preselected) - control color

Dr. Watson System Troubleshooting Utility - drwtsn32

Driver Verifier Utility - verifier


E


Event Viewer - eventvwr.msc


F


Files and Settings Transfer Tool - migwiz

File Signature Verification Tool - sigverif

Findfast - findfast.cpl

Firefox (if installed) - firefox

Folders Properties - control folders

Fonts - control fonts

Fonts Folder - fonts

Free Cell Card Game - freecell


G


Game Controllers - joy.cpl

Group Policy Editor (XP Prof) - gpedit.msc


H


Hearts Card Game - mshearts

Help and Support - helpctr

HyperTerminal - hypertrm


I


Iexpress Wizard - iexpress

Indexing Service - ciadv.msc

Internet Connection Wizard - icwconn1

Internet Explorer - iexplore

Internet Properties - inetcpl.cpl

Internet Setup Wizard - inetwiz

IP Configuration (Display Connection Configuration)- ipconfig /all

IP Configuration (Display DNS Cache Contents) - ipconfig /displaydns

IP Configuration (Delete DNS Cache Contents) - ipconfig /flushdns

IP Configuration (Release All Connections) - ipconfig /release

IP Configuration (Renew All Connections) - ipconfig /renew

IP Configuration (Refreshes DHCP & Re-Registers DNS) - ipconfig /registerdns

IP Configuration (Display DHCP Class ID) - ipconfig /showclassid

IP Configuration (Modifies DHCP Class ID)- ipconfig /setclassid


J


Java Control Panel (If Installed) - jpicpl32.cpl

Java Control Panel (If Installed) - javaws


K


Keyboard Properties - control keyboard


L


Local Security Settings - secpol.msc

Local Users and Groups - lusrmgr.msc

Logs You Out Of Windows - logoff


M


Malicious Software Removal Tool - mrt

Microsoft Access (if installed) - access.cpl

Microsoft Chat - winchat

Microsoft Excel (if installed) - excel

Microsoft Frontpage (if installed) - frontpg

Microsoft Movie Maker - moviemk

Microsoft Paint - mspaint

Microsoft Powerpoint (if installed) - powerpnt

Microsoft Word (if installed) - winword

Microsoft Syncronization Tool - mobsync

Minesweeper Game - winmine

Mouse Properties - control mouse

Mouse Properties - main.cpl


N


Nero (if installed) - nero

Netmeeting - conf

Network Connections - control netconnections

Network Connections- ncpa.cpl

Network Setup Wizard - netsetup.cpl

Notepad - notepad

Nview Desktop Manager (If Installed) - nvtuicpl.cpl


O


Object Packager - packager

ODBC Data Source Administrator - odbccp32.cpl

On Screen Keyboard - osk

Opens AC3 Filter (If Installed)- ac3filter.cpl

Outlook Express - msimn


P


Paint - pbrush

Password Properties - password.cpl

Performance Monitor - perfmon.msc

Performance Monitor - perfmon

Phone and Modem Options - telephon.cpl

Phone Dialer - dialer

Pinball Game - pinball

Power Configuration - powercfg.cpl

Printers and Faxes - control printers

Printers Folder - printers

Private Character Editor - eudcedit


Q


Quicktime (If Installed) - QuickTime.cpl

Quicktime Player (if installed) - quicktimeplayer


R


Real Player (if installed) - realplay

Regional Settings - intl.cpl

Registry Editor - regedit

Registry Editor - regedit32

Remote Access Phonebook - rasphone

Remote Desktop - mstsc

Removable Storage - ntmsmgr.msc

Removable Storage Operator Requests - ntmsoprq.msc

Resultant Set of Policy (XP Prof) - rsop.msc


S

Scanners and Cameras - sticpl.cpl

Scheduled Tasks - control schedtasks

Security Center - wscui.cpl

Services - services.msc

Shared Folders - fsmgmt.msc

Shuts Down Windows - shutdown

Sounds and Audio - mmsys.cpl

Spider Solitare Card Game - spider

SQL Client Configuration - cliconfg

System Configuration Editor - sysedit

System Configuration Utility - msconfig

System File Checker Utility (Scan Immediately) - sfc /scannow

System File Checker Utility (Scan Once At Next Boot)- sfc /scanonce

System File Checker Utility (Scan On Every Boot)- sfc /scanboot

System File Checker Utility (Return to Default Setting) - sfc /revert

System File Checker Utility (Purge File Cache) - sfc /purgecache

System File Checker Utility (Set Cache Size to size x) - sfc /cachesize=x

System Information - msinfo32

System Properties - sysdm.cpl


T


Task Manager - taskmgr

TCP Tester - tcptest

Telnet Client - telnet

Tweak UI (if installed) - tweakui


U


User Account Management - nusrmgr.cpl

Utility Manager - utilman


W


Windows Address Book - wab

Windows Address Book Import Utility - wabmig

Windows Backup Utility (if installed) - ntbackup

Windows Explorer - explorer

Windows Firewall - firewall.cpl

Windows Address Book - wab

Windows Address Book Import Utility - wabmig

Windows Backup Utility (if installed) - ntbackup

Windows Explorer - explorer

Windows Firewall - firewall.cpl

Windows Magnifier - magnify

Windows Management Infrastructure - wmimgmt.msc

Windows Media Player - wmplayer

Windows Messenger - msmsgs

Windows Picture Import Wizard (need camera connected) - wiaacmgr

Windows System Security Tool - syskey

Windows Update Launches - wupdmgr

Windows Version (to show which version of windows) - winver

Windows XP Tour Wizard - tourstart

Wordpad - write

Make Firefox faster - Lower the amount of memory it used

If you have old desktop PC of RAM less than 1 GB and have installed firefox. Then may be you noticed that your computer slow down after its installation. Here is trick to make it faster by decrease the amount of memory it used.


If your computer has ram of 1 gb or more than 1 gb, then you need not to do this.
Follow given steps:
1). Open firefox.

2). In your Firefox address bar, enter the following text: about:config.

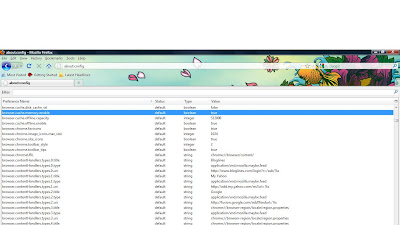
3). Scroll down to the entry titled browser.cache.memory.enable and make sure the Value is set to true. If it’s not, double-click anywhere in the browser.cache.memory.enable line and the status will change to true.

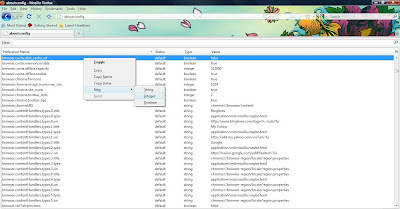
4). Now Right-click anywhere in the about:config window and select New and then Integer.


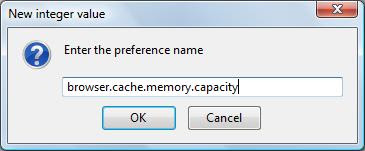
5). Enter preference name as browser.cache.memory.capacity in the New integer value window.


6). Click OK.

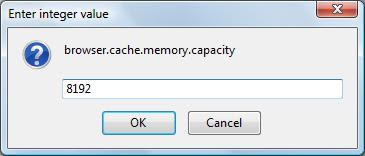
7). Now you have to enter a number in the Enter integer value, but that number depends on how much memory you have , how much you want to give Firefox. If you have 256MB or less RAM, enter 4096 as the value. If you have 512MB of RAM, enter 6144 or 8192.


8). Click OK.

Its done.

Restart firefox and seee then changes. It must be much faster now..


Hide Hard drive's partition by using command Prompt - without any software

Do you have some confidential data and dont wanna share that data with your friends and other persons. so now you can hide any of partition of your hard drive, just store all your confidential and private data in that hard disk partition and hide that partition. Here is a very cool and simple trick , for this you need not to install any software. this can be done just by using command prompt.
Follow given steps to hide partitions without using any software.

1). Go to Start and type Run.

2). Type Diskpart in run and press Enter.
window will askes for our permission to continur. click on continue.
3). In the console type List volume to see all the drives available on your PC/Computer ad their volume.

4). Now select the drive which you want to hide.
Suppose you want ot delete D drive. '
It is volume 1 for drive D. you can found volume from command prompt itself as it list volume with each disk partition as shown in figure.


5). Now to hide D drive type Select volume 1 .


6). Type remove letter d , this will hide your drive.
Its done.

Now d drive is hidden.

Now to get your drive back type Select volume 1 and then type assign letter d.

Create a Image Trail in Paint - Funny Paint Tricks


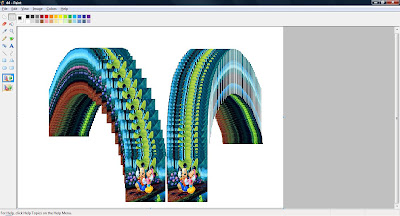
Wanna have some fun in paint?? try this, Here are instructions to make an image trail in paint. you can make very wonderful paintigs by using this.


Follow these Steps:

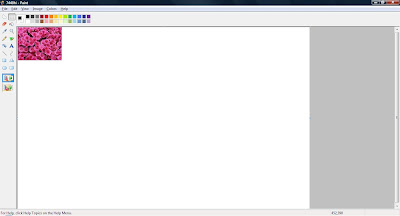
1). Open paint.

2). Go to file menu and click on open.

3). Browse to the image which you want to work on.


4). Click on open image.


5). You can resize image by right cliking on that and select resize.

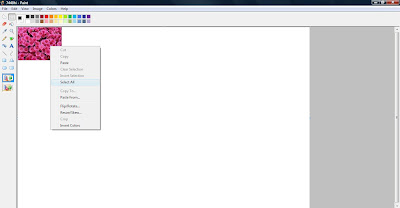
6). Right click on image and click on select all.
You can also make trail of some part of picture for that you have to select only that part instead of select all.


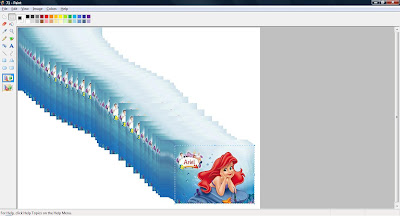
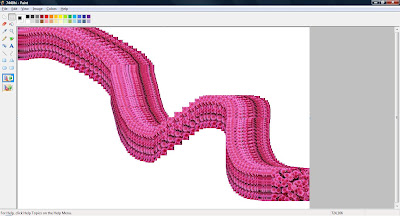
7). Now hold Shift key and move the image all around.
The image will be drawnwith trail.

Its done.


You can make several bautiful images by using this trick, Enjoy painting..
Be crative and Be innovative...

Tuesday, July 27, 2010

Add images to Gmail Signature

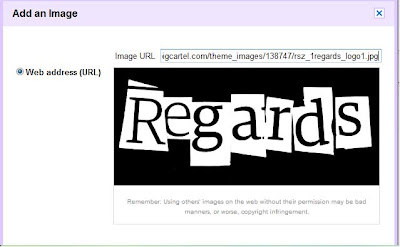
Now you can add image in your gmail signature, So whenever you send any email it automatically add that image at the bottom of your composed mail and send. You can also place links and some text in our signature.


follow given steps:

1). Open your
Gmail account.

2). Now click on
Settings on top right side.

3). In settings, click on
Insert image icon.


4). It will open add an image window, Here enter a
Valid image URL. If you entered correct image URL then it will show you preview of image.


5). Click
OK.

You can also adjust the size of image by just selecting and resizing through mouse from corners.


6). Now in settings page, scroll down and click on
save changes.

Its done.

View streets through Google Street View

Now you can view streets of US without going US, you can visit there while sitting in front of your computer.

This is possible now with the help of Google Street View, a new service by google by which you can view the streets of some areas. Till now this service is only available to few countries like us and not for India, most likely Google will soon add this feature for other countries. This feature is a very innovative but on the other hand, it could be also used for bad reasons.

Here are some instructions to use Stret View

Zoom To zoom closer into the earth press the + button in the navigation bar on the left of the screen. You can also zoom closer by double left clicking your mouse, or moving the scroll wheel forward.

Tilting Using your keyboard, simultaneously hold down the Shift key and the Up arrow to tilt down or the Down arrow to tilt up. To tilt, you can also select Shift and use the scroll wheel on your mouse. You will be able to see 3D buildings, structures and terrain as shown below.

Search, Customize and Send Your View Enter any place in the Search bar, and you will fly to your point of interest. Use the navigation controls to customize your view, zooming and tilting to experience your place in 3D.


Go to Google Maps, to view streets as this feature is merged with Google Maps and enjoy!!!


Rename several Files in sequence at once - Useful Trick

When we transfer photos from digital camera or from mobiles, they often have unrecognizable names. Renaming all files one by one is very annoying task also it can take forever if you have really large number of files. So here i am providing you an easy method to rename all image files at once. This works for renaming all types of files.

Just follow given steps:

1. Open the folder which contains files you want to rename.

2. Select the files you want to rename.

3. Now right click on any one of selected file and click on Rename.


4.Type the new name, and then press ENTER.


Its done.

All of the files in the series will be named in sequence using the new name you type.

For example, in this case I rename 1 file as Disney, so the first file is disney and others are disney (1), disney (2), and so on.

Monday, July 26, 2010

Additional clocks in taskbar using windows vista - Cool Vista Trick

A useful feature in Windows Vista, especially for those users who wants to communicate regularly with people in different time zones. If you want to communicate with your co-workers or your family members in different time zones or you are traveling between different time zones then this tip is very useful for you.


You can add clock of two different time zones in windows vista tasks bar. You can set three clocks (one default clock) in the tasks bar and each clock will show you time of different zones.

To edit this feature, you will need to be logged into your computer with administrative rights.To enable this feature, perform the steps listed below:

1). First right click on the clock in taskbar then click on Adjust Date/Time option.
2). A window dialog box will appear with the title Date and Time Properties, select the Additional Clocks tab.
3). Now check the box Show this clock for additional clock and using drop down menu, select your required time zone then enter display name.


4). Press Apply button to save these settings and then Ok button to finish .


Here you can view the time of three different zones when mousing over the clock in the taskbar.
If you want to see it in enlarge view, double click on clock area.