Showing posts with label USB. Show all posts

Tuesday, August 17, 2010

Portable Music player - Carry audio player in USB

USB Pen Drives are a great way to carry your files around, and that includes your favourite collections of audio files. But it's very diffcult and slso annoying to manage all audio and video files without favourite music player.

So here is one Audio media player for your USB Pen Drive that you can carry around along with your media collection. Its name is CoolPlayer+.


CoolPlayer+ Portable is an easy to use audio player which allows user to listen to his music wherever he go. It can be placed on USB flash drive, iPod, portable hard drive or a CD. You can use it on any computer, without leaving any personal information behind.

Its a freeware utlity software, you can download it easily form internet.

Click here to Download

Saturday, July 31, 2010

Use Pendrive as RAM in window VISTA - Useful Vista Trick

If you have Window vista installed in your computer and have less RAM, then you must be tierd of window vista's slow performance. But now here is 1 solution you can increase the RAM allowing the operating system more space of cache and fast access memory.

Vista provides a great feature called Ready boost. With this feature, you can utilize your pen drive or a memory card as RAM. With this feature, it increases the additional memory in your computer system to improve the performance of your personal computer.


you need to enable ready boost, Just follpw these steps:

1). When you plug the USB device in the USB port, it will show the message speed up my system using windows ready boost, Click on it.


2). Go to Pendrives Properties and click on Ready Boost tab.

3). Choose the option use this device and increase the limit of space to serve for your system speed option. The reservation of memory is depending on the capacity of pen drives.

4). Click OK.

Its done.

Friday, July 30, 2010

Keep your Programs in your USB drives - Cool USB Trick

Sometimes its very frustrating when we take our files to another computer and just discoverd that the software required to read the files is not installed. This situstion is really very annoying

Here’s the simplest solution for this problem – take your programs with you – on your USB drive. You can carry your favorite computer programs along with all of your bookmarks, settings, email and more with you. Use them on any Windows computer. All without leaving any personal data behind.

For this you have to download a software Portable Apps. Its an open platform that works with any hardware you like (USB flash drive, iPod, portable hard drive, etc). ITs freely available on Internet.

Follow given steps:

1). Go to the Portable Apps website and download the installer, choosing the software you want to carry along.

2). Run the installer and install the software to the root of your USB thumb drive.

Its done! !!

As soon as you connect your thumb drive into a computer, Portable Apps will open up automatically.

Click here to acess Potable Apps

Sunday, July 25, 2010

Lock your PC with USB Drive - Cool Computer Tricks


Here is a cool trick to lock your PC with USB drive. It can be done with the help of a free program called USB PC Lock Pro. It works on Windows only and needs to be installed on the computer and not on the USB flash drive.


USB PC Lock Pro Turns any USB Flash Drive into a key that prevents unauthorized people from using your computer. USB pc Lock will automatically lock your computer and perform other actions when you step away from it.

It Stops streaming media traffic, Mute audio and Start/Stop event logger.

This program is freely available on internet. You can download it from anywhere and have to installed it on your computer.

Click Here To download USB PC Lock Pro

Sunday, April 25, 2010

Delete viruses from pendrives using CMD


Mostly our pc get attacked by viruses from pendrives, so here is way to protect your pendrive and computer from viruses. Just follow these steps and delete viruses from pendrive without affecting your pc.
Here are steps:

1). Connect your pendrive and do not open it by using autorun.

2). Open Run and type cmd and press enter.

3). In the Command Prompt, Type the drive letter of your pendrive(you can check it from my computer) and then press enter.

4). Type dir/w/o/a/p and press Enter.
It will display list of files.

5). Now in that list search for virus files like:


Autorun.inf

New Folder.exe

Bha.vbs

Iexplore.vbs

Info.exe

New_Folder.exe

Ravmon.exe

RVHost.exe

any other files with .exe Extension . *

6). If it contains any of the files above file then type attrib -h -r -s -a *.* and press Enter.

7). Delete each of that file using delete Command
del filename (For exaple: del autorun.inf )

Its done!
Now you can scan your pendrive with any good antivirus and then can open it without affecting your system.

Wednesday, April 21, 2010

Use keyboard shortcut to safely remove Hardware (Pendrives)


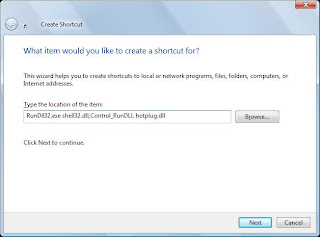
If you use pendrives frequently and find bit typical to click on the task bar and then safely remove the pendrive then here is a trick for you to create a shortcut for safely removal of pendrives. Just follow given steps:

1). Right click on desktop, Go to new -> shortcut..
2). In Create shortcut window, Type RunDll32.exe shell32.dll,Control_RunDLL hotplug.dll.

3). Click next and then .
shortcut is created.
Now you can use this shortcut to remove pendrive or you can assign a shortcut key to it.
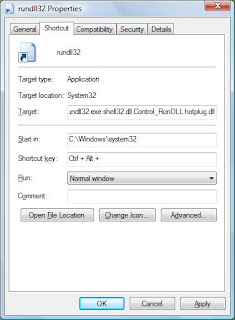
For assigning shortcut key,
1). Right click on shortcut icon.
2). Select properties.
3). In properties window, click on shortcut tab.
4). Assign a shortcut key to it(it will take clrt + alt by default)eg: if you press A shortcut will be ctrl+alt+A.

5). Click ok.

Its done.
Now you can use your keyboard shortcut key to safely remove your pendrives.

Monday, April 19, 2010

Recycle bin for Pendrive


Whenever we delete something from a USB flash drive or pendrive, it never goes to system's recycle bin. This feature is very annoying when we accidently delete something from pendrive. Now here is solution for this problem. You can use IBIN, an application which creates a portable Recycle Bin on your USB flash drive.

whenever you delete something on your USB drive it will give you an option Dump into Bin. Later, when you need to recover or permanent delete any file then just right click on iBin tray icon and click on Dumping Management. Here you have options for restore and for permanently delete.
It is free to download.

Tuesday, March 23, 2010

Forcefully eject Pendrive - Cool Computer Tricks

Here is a free utility called EjectUSB that forcefully stops all the running programs and helps in ejecting pen drives safely.
It is designed to be a simple utility to close all programs running from a specified drive or folder and then attempt ejection if a drive was specified.


Friday, March 12, 2010

Assign Permanent Letter to USB drive

If you have multiple pen drives you might have noticed that every time you put in your drive it will be assigned a different drive letter. This can be very annoying, when you trying to open files of pendrive from some software as recent drive letter is changed you have to change address again. So now here is one solution for this problem assign permanent letter to your USB pendrive. Its very simple just follow given steps:

1). Go to Start and then Run.

2). Type mmc in the box and press enter.
(mmc is microsoft console management)

3). Now in console window click on new option in file.

4). Now select File -> Add/Remove Snap-in.

5). In add and remove snaps in window select Disk Management and then click on Add.

6). In disk management window, select This computer and then click on Finish.


7). Now press OK on the Add or Remove snap-ins screen.

8). Now select Disk Management from the left menu.

9).You will now see all of your drives/partitions in the right hand side panel.

10). Right click the USB drive you want to assign a permanent letter to and select Change Drive Letter and Paths.


11). Click on Change.


12). Select a permanent letter.


13). Click OK.

14). It will warn you about making the change - there is little chance programs you use will be affected by this. If they will, you will probably already be aware of this so don’t worry.

15). The final step is to select File > Save and save the file in the default directory. Close the Console and you are done.

Its done..

Saturday, January 16, 2010

Delete Safely Remove Hardware Icon

If you have an USB device attached to your system, you will notice an icon in the Notification area, which when clicked will give you the option to Stop your hardware, before you unplug it. And if usb device permanently attached to your system and you never unplug this hardware. So now you can get rid of that icon. just follow these steps:

1). Right-click the notification area, and selecting Properties.
2). Under the Notification area heading, click Customize.
3). Find the Safely Remove Hardware icon and select Always hide in the Behavior column next to it.
4).press OK and Apply.

It will hide that safely remove hardware icon permanently.

Friday, January 15, 2010

Block and Enable usage of USB Removable Disks

This tip will allow you to block usage of USB removable disks, but will continue to allow usage of USB mice, keyboards or any other USB-based device that is NOT a portable disk.

Block usage of USB Removable Disks

To block your computer's ability to use USB Removable Disks follow these steps:
1. Open Registry Editor.

2. In Registry Editor, navigate to the following registry key:
HKEY_LOCAL_MACHINE\SYSTEM\CurrentControlSet\Services\USBSTOR

3. Locate the following value (DWORD):Start and give it a value of 4(four).

4. Close Registry Editor.

You do not need to reboot the computer for changes to apply.


Enable usage of USB Removable Disks

To return to the default configuration and enable your computer's ability to use USB Removable Disks follow these steps:

1. Go to the registry path found above.

2. Locate the following value: Start and give it a value of 3(three).